> ## Documentation Index
> Fetch the complete documentation index at: https://learn.usecardboard.com/llms.txt
> Use this file to discover all available pages before exploring further.
# Timeline Editing
> AI gave you a great first cut. But sometimes you need that hands-on control.
We're still working on that vlog reel. AI handled the heavy lifting, but now you want to **fine-tune specific moments.**
## The Timeline: Your Control Centre
Bottom of your screen - that's the timeline. **Every clip, every transition, every audio track lives here.**
Think of it like a horizontal canvas where time flows left to right. What you see is what plays.
 ## What you can do
Your clips are in the wrong order? Just drag and drop.
**How to reorder:**
1. Click on any clip in the timeline
2. Drag it left or right
3. Drop it where you want it
The other clips automatically shift to make room. No gaps, no mess.
**Why you'd do this:**
* Put your best shot first to hook viewers
* Rearrange the story flow
* Move the punchline to the end.
Got extra footage at the start or end of a clip? Trim it.
**How to trim:**
1. Hover over the edge of any clip (left or right)
2. Your cursor changes to a resize arrow
3. Click and drag inward to shorten, outward to extend
Watch the preview as you drag – you'll see exactly where you're cutting.
**Pro tip:** Use **Ripple Edit** on the top right of the timeline panel. Once you trim a clip, others automatically adjust.
Need to cut a clip in half? Maybe remove a boring middle section?
**How to split:**
1. Select the razor tool from top left corner of timeline panel
2. Hover over the clip
3. Click from where you want to split
Now you've got two separate clips. Delete one, move them apart, or add something between them.
**When you'd split:**
* Remove a bad section from the middle
* Insert B-roll between parts of a talking head
* Create jump cuts for tighter pacing
Made a mistake? Don't need a clip? Delete it.
**How to delete:**
1. Click the clip you want to remove
2. Hit Delete key
The timeline adjusts automatically. No gaps left behind.
Sometimes after deleting or moving clips, you get awkward empty spaces on the timeline.
**How to remove gaps:**
1. Look at your timeline—see those empty spaces between clips?
2. Click the three dots near "Track 1" on the left
3. Choose "Remove gaps" (hover to see where they are)
All your clips snap together. Clean timeline, smooth playback.
Your voiceover is too quiet? Background music drowning out your words? Fix it.
**How to adjust volume:**
1. Click on any clip with audio
2. Look for volume slider in the left panel
3. Drag the volume line up (louder) or down (quieter)
**Pro tip:** Duck your music when you're talking. Lower the music volume during voiceover sections, raise it during B-roll.
Want to keep the video but remove its audio? Maybe you want to replace it with a voiceover or different music.
**How to mute a clip:**
1. Right-click on the clip
2. Select "Mute"
Now audio and video are separate tracks on the timeline. Edit them independently.
**When you'd do this:**
* Replace original audio with voiceover
* Use video from one clip, audio from another
* Remove camera audio entirely
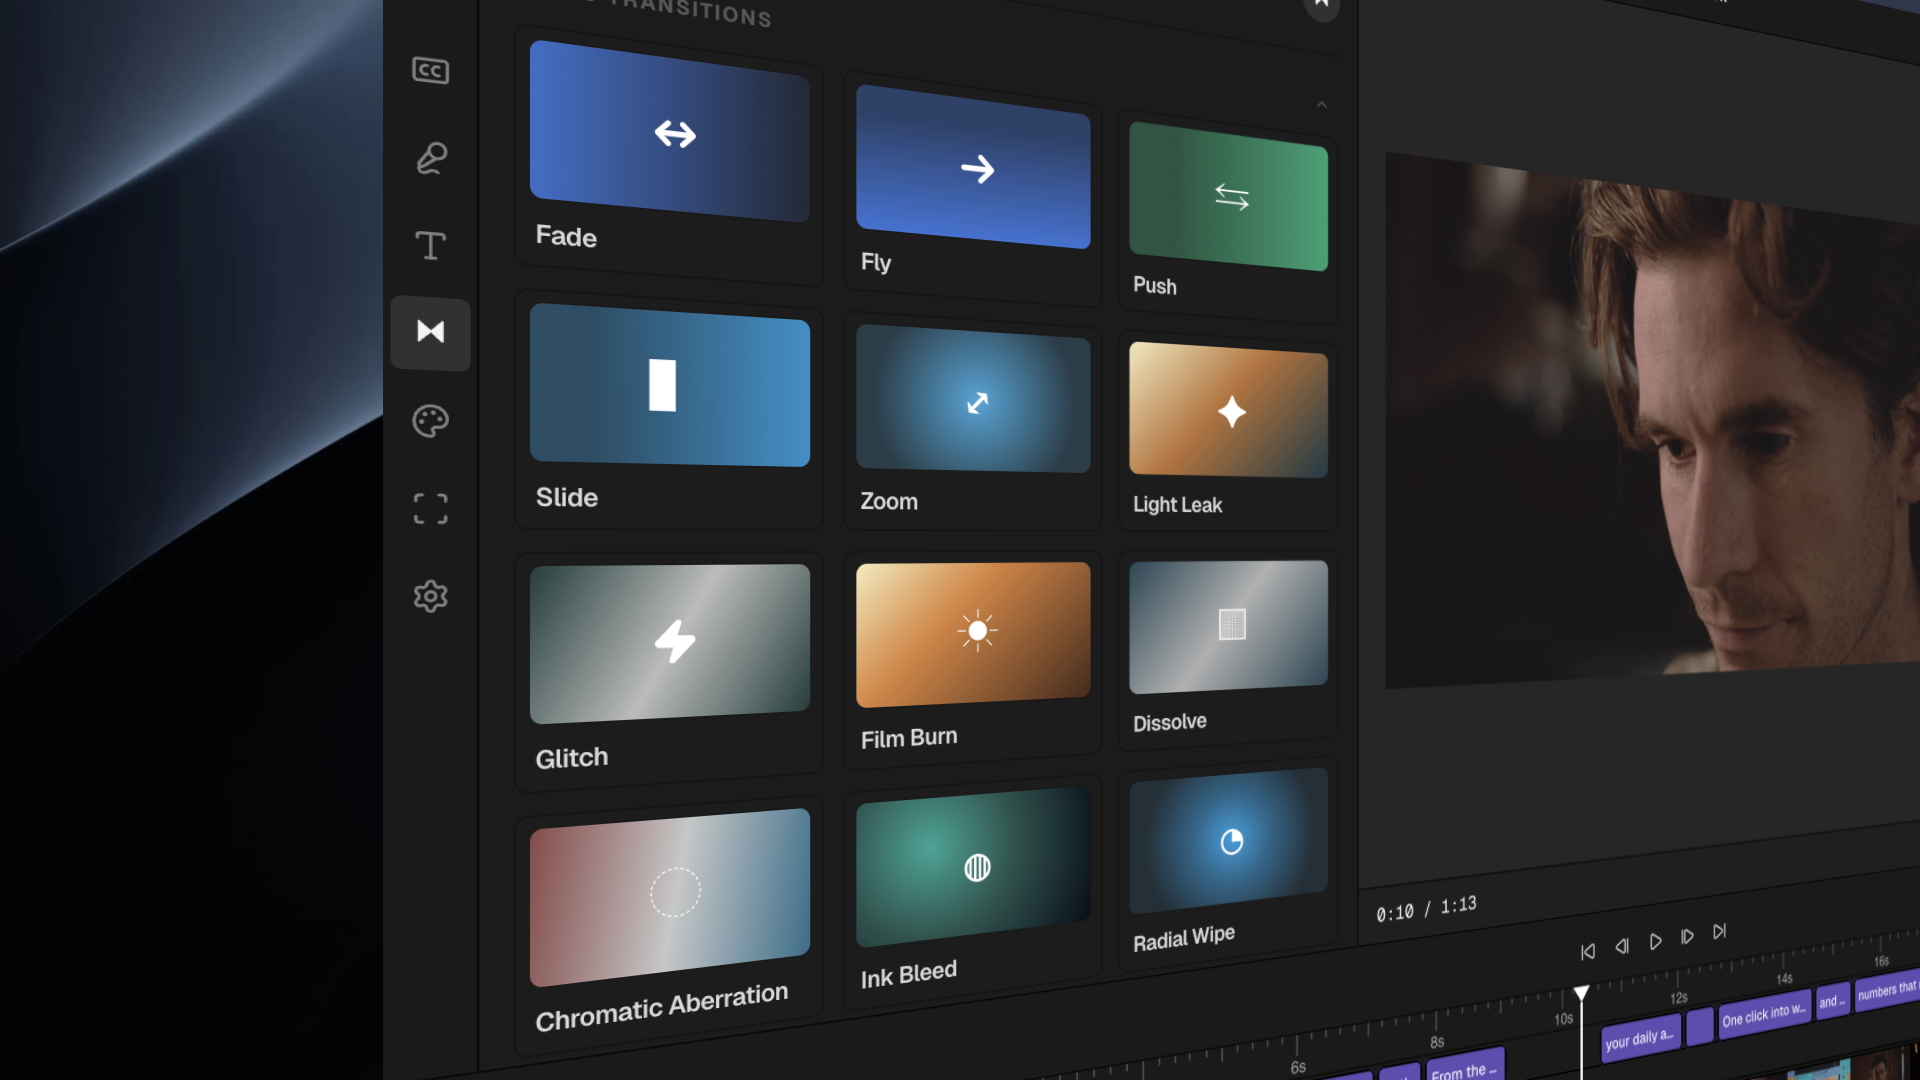
Transitions smooth out the jumps between clips.
**How to add transitions:**
1. Click between two clips (where they meet)
2. Look at the left panel → Transitions
3. Drag a transition (fade, dissolve, wipe) onto the join point
**Pro tip:** Less is more. Most cuts don't need transitions.
Want to speed up or slow down a clip?
**How to change speed:**
1. Click the clip
2. Look in the left panel for "Speed" or "Duration"
3. Adjust the playback speed
Want to add text overlays, titles, or lower thirds?
**How to add text:**
1. Click the Text tool in the left panel
2. Choose a style (or start blank)
3. Type your text
4. Drag it onto the timeline above your video
Position it on the canvas, resize it, change colors - it's all in the left panel.
Want to show two videos at once? Create a picture-in-picture effect.
**How to layer:**
1. Drag a second clip onto the timeline *above* your main clip (new track)
2. Resize it on the canvas to make it smaller
3. Position it in a corner
**When you'd use this:**
* Reaction shots while showing the main content
* Show your face while doing a screen recording
* Before/after comparisons side by side
Timeline can have multiple layers - video tracks stack vertically.
**How tracks work:**
* Track 1 (bottom): Background/main footage
* Track 2: Overlays, B-roll, PIP
* Track 3+: More overlays, text, effects
Top tracks appear *on top* of lower tracks.
Want to zoom into your subject? Create a crop effect?
**How to zoom:**
1. Click the clip
2. Look in the left panel for "Transform" or "Crop"
3. Adjust accordingly
**When you'd zoom:**
* Focus on a detail (product feature, facial expression)
* Create dynamic movement in a static shot
* Crop out unwanted edges or people
Make your colors pop or match clips shot in different lighting.
**How to adjust color:**
1. Select “Color grading” from the left panel
2. Hover over the options to check how it feels.
3. Select the one you like, or stack multiple at once
Make your cuts sync to the music beat for a professional feel.
**How to snap to beat:**
1. Play your video and listen to the music
2. Mark the beats (where you hear the thump)
3. Split your clips at those points
4. Align clip changes to beat markers
**Why this matters:** Videos that cut on beat feel more polished and engaging.
You can also use AI Chat for timeline edits — try "Trim the first 5 seconds off every clip" or "Delete all clips shorter than 2 seconds."
## Keyboard shortcuts
* **Space** — Play / Pause
* **L** — Play forward
* **J** — Play backward
* **Left arrow** — Move playhead back one frame
* **Right arrow** — Move playhead forward one frame
* **C** — Razor / Split tool
* **R** — Toggle ripple edit mode
* **V** — Selection tool (default)
* **Backspace / Delete** — Delete selected clip
* **Cmd/Ctrl+D** — Duplicate selected clip
* **Cmd/Ctrl+C** — Copy clip
* **Cmd/Ctrl+V** — Paste clip
* **Cmd/Ctrl+Z** — Undo
* **Cmd/Ctrl+Shift+Z** — Redo
* **Cmd/Ctrl + +** — Zoom in on timeline
* **Cmd/Ctrl + -** — Zoom out on timeline
* **Home** — Jump to beginning
* **End** — Jump to end
## What's next?
Import and find your media files.
Use AI commands to edit your timeline faster.
## What you can do
Your clips are in the wrong order? Just drag and drop.
**How to reorder:**
1. Click on any clip in the timeline
2. Drag it left or right
3. Drop it where you want it
The other clips automatically shift to make room. No gaps, no mess.
**Why you'd do this:**
* Put your best shot first to hook viewers
* Rearrange the story flow
* Move the punchline to the end.
Got extra footage at the start or end of a clip? Trim it.
**How to trim:**
1. Hover over the edge of any clip (left or right)
2. Your cursor changes to a resize arrow
3. Click and drag inward to shorten, outward to extend
Watch the preview as you drag – you'll see exactly where you're cutting.
**Pro tip:** Use **Ripple Edit** on the top right of the timeline panel. Once you trim a clip, others automatically adjust.
Need to cut a clip in half? Maybe remove a boring middle section?
**How to split:**
1. Select the razor tool from top left corner of timeline panel
2. Hover over the clip
3. Click from where you want to split
Now you've got two separate clips. Delete one, move them apart, or add something between them.
**When you'd split:**
* Remove a bad section from the middle
* Insert B-roll between parts of a talking head
* Create jump cuts for tighter pacing
Made a mistake? Don't need a clip? Delete it.
**How to delete:**
1. Click the clip you want to remove
2. Hit Delete key
The timeline adjusts automatically. No gaps left behind.
Sometimes after deleting or moving clips, you get awkward empty spaces on the timeline.
**How to remove gaps:**
1. Look at your timeline—see those empty spaces between clips?
2. Click the three dots near "Track 1" on the left
3. Choose "Remove gaps" (hover to see where they are)
All your clips snap together. Clean timeline, smooth playback.
Your voiceover is too quiet? Background music drowning out your words? Fix it.
**How to adjust volume:**
1. Click on any clip with audio
2. Look for volume slider in the left panel
3. Drag the volume line up (louder) or down (quieter)
**Pro tip:** Duck your music when you're talking. Lower the music volume during voiceover sections, raise it during B-roll.
Want to keep the video but remove its audio? Maybe you want to replace it with a voiceover or different music.
**How to mute a clip:**
1. Right-click on the clip
2. Select "Mute"
Now audio and video are separate tracks on the timeline. Edit them independently.
**When you'd do this:**
* Replace original audio with voiceover
* Use video from one clip, audio from another
* Remove camera audio entirely
Transitions smooth out the jumps between clips.
**How to add transitions:**
1. Click between two clips (where they meet)
2. Look at the left panel → Transitions
3. Drag a transition (fade, dissolve, wipe) onto the join point
**Pro tip:** Less is more. Most cuts don't need transitions.
Want to speed up or slow down a clip?
**How to change speed:**
1. Click the clip
2. Look in the left panel for "Speed" or "Duration"
3. Adjust the playback speed
Want to add text overlays, titles, or lower thirds?
**How to add text:**
1. Click the Text tool in the left panel
2. Choose a style (or start blank)
3. Type your text
4. Drag it onto the timeline above your video
Position it on the canvas, resize it, change colors - it's all in the left panel.
Want to show two videos at once? Create a picture-in-picture effect.
**How to layer:**
1. Drag a second clip onto the timeline *above* your main clip (new track)
2. Resize it on the canvas to make it smaller
3. Position it in a corner
**When you'd use this:**
* Reaction shots while showing the main content
* Show your face while doing a screen recording
* Before/after comparisons side by side
Timeline can have multiple layers - video tracks stack vertically.
**How tracks work:**
* Track 1 (bottom): Background/main footage
* Track 2: Overlays, B-roll, PIP
* Track 3+: More overlays, text, effects
Top tracks appear *on top* of lower tracks.
Want to zoom into your subject? Create a crop effect?
**How to zoom:**
1. Click the clip
2. Look in the left panel for "Transform" or "Crop"
3. Adjust accordingly
**When you'd zoom:**
* Focus on a detail (product feature, facial expression)
* Create dynamic movement in a static shot
* Crop out unwanted edges or people
Make your colors pop or match clips shot in different lighting.
**How to adjust color:**
1. Select “Color grading” from the left panel
2. Hover over the options to check how it feels.
3. Select the one you like, or stack multiple at once
Make your cuts sync to the music beat for a professional feel.
**How to snap to beat:**
1. Play your video and listen to the music
2. Mark the beats (where you hear the thump)
3. Split your clips at those points
4. Align clip changes to beat markers
**Why this matters:** Videos that cut on beat feel more polished and engaging.
You can also use AI Chat for timeline edits — try "Trim the first 5 seconds off every clip" or "Delete all clips shorter than 2 seconds."
## Keyboard shortcuts
* **Space** — Play / Pause
* **L** — Play forward
* **J** — Play backward
* **Left arrow** — Move playhead back one frame
* **Right arrow** — Move playhead forward one frame
* **C** — Razor / Split tool
* **R** — Toggle ripple edit mode
* **V** — Selection tool (default)
* **Backspace / Delete** — Delete selected clip
* **Cmd/Ctrl+D** — Duplicate selected clip
* **Cmd/Ctrl+C** — Copy clip
* **Cmd/Ctrl+V** — Paste clip
* **Cmd/Ctrl+Z** — Undo
* **Cmd/Ctrl+Shift+Z** — Redo
* **Cmd/Ctrl + +** — Zoom in on timeline
* **Cmd/Ctrl + -** — Zoom out on timeline
* **Home** — Jump to beginning
* **End** — Jump to end
## What's next?
Import and find your media files.
Use AI commands to edit your timeline faster.